0%

发布jar包到maven中央仓库

前言

我们知道在 maven 中引入第三方 jar 包是非常简单的,只需要使用 groupId+artifactId+version 就能从 maven 仓库中下载下来对应的 jar 包。

例如:引入 fastjson 的 jar 包

1
2
3
4
5
<dependency>
<groupId>com.alibaba</groupId>
<artifactId>fastjson</artifactId>
<version>1.2.46</version>
</dependency>

那如果想要发布自己的 jar 包到 maven 仓库应该如何操作呢。

创建 issue

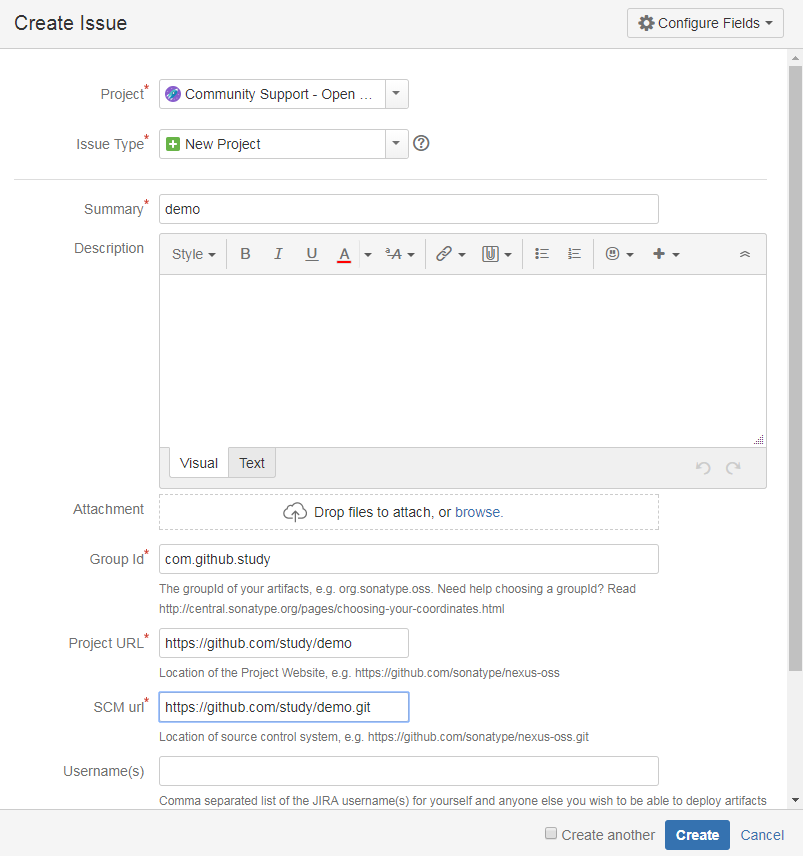
要发布 jar 包到 maven 仓库首先需要人工审核,在审核过了的话才可以进行后续发布 jar 包的操作。首先需要在https://issues.sonatype.org/secure/Dashboard.jspa上注册一个账号,登录之后点击Create,在弹出来的界面中填写响应的信息

Create issue

  • Project 选择 Community Support,Issue type 选择 New Project。
  • 注意 Group Id,如果有对应域名的话则使用域名对应的 Group Id(例如 netty 项目的域名是 netty.io,则 Group Id 为 io.netty),没有的域名的话最好就填com.github.xxx,因为在 issue 里会有人问你是否拥有 Group Id 对应的域名,没有的话是审核不过的,而托管在 github 上的话就可以直接使用 github 的域名来完成审核。

issue 审核

创建成功后等 1-2 个小时左右就会有工作人员评论 issue,问你是否持有域名。

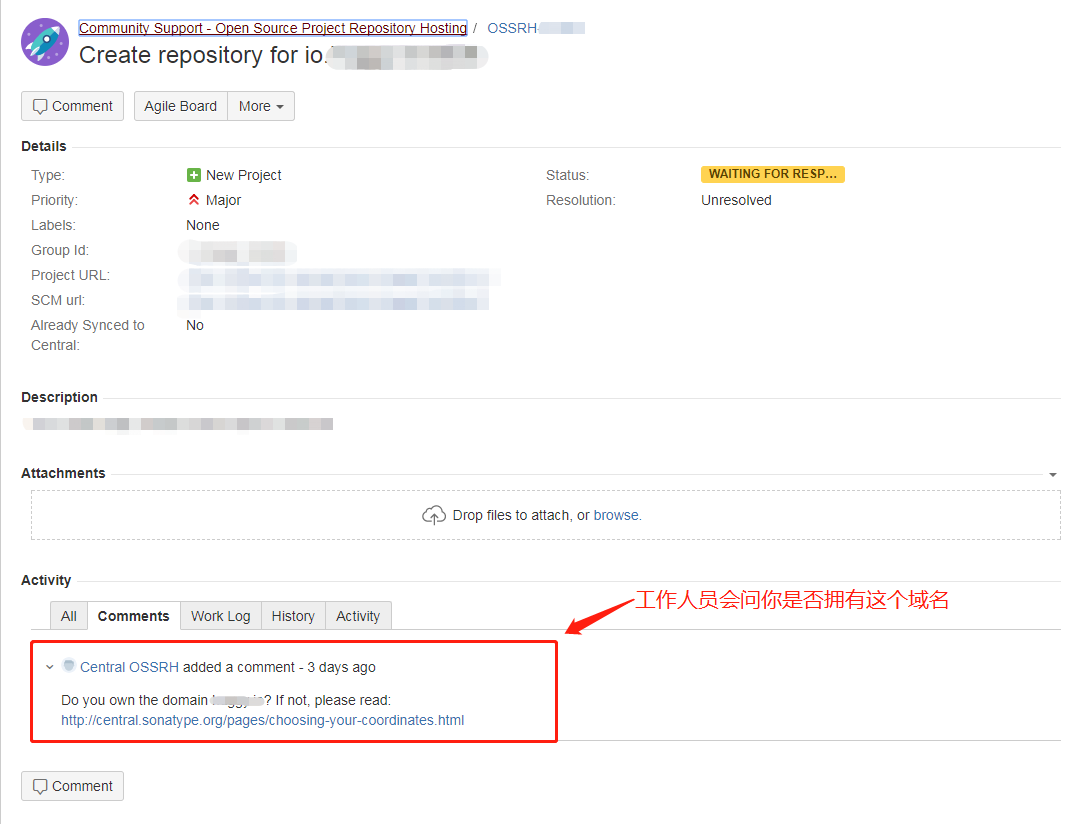
如果是用com.github.xxx的 Group Id,就回复要使用com.github.xxx作为你的域名,否则有域名就回复有就好,接着等待工作人员确认(我等了一天),确认成功之后 issue 的状态就会变成RESOLVED,这个时候就有资格上传 jar 包到 maven 仓库了。

gpg 管理密钥

在上传 jar 包之前,先要生成 gpg 工具生成 RSA 密钥对,并把公钥上传到公共密钥服务器,这样在发布 jar 包的时候能校验用户的身份。

  1. 下载 gpg 工具,下载地址:https://www.gnupg.org/download/index.html,下载对应操作系统的版本然后进行安装。
  2. 验证安装和上传生成的公钥
  • 验证 gpg 是否安装成功

    1
    gpg --version
  • 生成 RAS 密钥对

    1
    gpg --gen-key

    接着需要填写名字和邮箱等等基本信息,这些都不是重点,最主要的是有个Passphase的选项在填完之后记下来,到时候发布 jar 包的时候要用到。

  • 查看生成的密钥,并上传至密钥服务器
    需要上传到服务器的就是 pub 里的公钥串FC27E7C61FC5D176DD7F67198C6EFA8E944CD6BA

    1
    gpg --list-keys
    1
    2
    3
    4
    5
    ----------------------------------------------
    pub rsa2048 2018-07-19 [SC] [expires: 2020-07-18]
    FC27E7C61FC5D176DD7F67198C6EFA8E944CD6BA
    uid [ultimate] liwei <liwei2633@163.com>
    sub rsa2048 2018-07-19 [E] [expires: 2020-07-18]

    上传公钥至密钥服务器,国内我测试了的服务器基本就这个hkp://keyserver.ubuntu.com:11371能用。

    1
    gpg --keyserver hkp://keyserver.ubuntu.com:11371 --send-keys FC27E7C61FC5D176DD7F67198C6EFA8E944CD6BA

    上传完后验证是否成功

    1
    gpg --keyserver hkp://keyserver.ubuntu.com:11371 --receive-keys FC27E7C61FC5D176DD7F67198C6EFA8E944CD6BA

    验证成功

    1
    2
    gpg: Total number processed: 1
    gpg: unchanged: 1

maven 配置

  1. 修改项目中的pom.xml文件,添加部署相关配置,这里引用贴下我的配置,只需要替换下相应的内容就好。
1
2
3
4
5
6
7
8
9
10
11
12
13
14
15
16
17
18
19
20
21
22
23
24
25
26
27
28
29
30
31
32
33
34
35
36
37
38
39
40
41
42
43
44
45
46
47
48
49
50
51
52
53
54
55
56
57
58
59
60
61
62
63
64
65
66
67
68
69
70
71
72
73
74
75
76
77
78
79
80
81
82
83
84
85
86
87
88
<name>pdown-core</name>
<description>HTTP high speed downloader</description>
<url>https://github.com/proxyee-down-org/pdown-core</url>

<licenses>
<license>
<name>The MIT License (MIT)</name>
<url>http://opensource.org/licenses/mit-license.php</url>
</license>
</licenses>

<developers>
<developer>
<name>monkeyWie</name>
<email>liwei2633@163.com</email>
</developer>
</developers>

<scm>
<connection>scm:git:https://github.com/proxyee-down-org/pdown-core.git</connection>
<developerConnection>scm:git:https://github.com/proxyee-down-org/pdown-core.git</developerConnection>
<url>https://github.com/proxyee-down-org/pdown-core</url>
</scm>

<profiles>
<profile>
<id>release</id>
<build>
<plugins>
<!--Compiler-->
<plugin>
<groupId>org.apache.maven.plugins</groupId>
<artifactId>maven-compiler-plugin</artifactId>
</plugin>
<!-- Source -->
<plugin>
<groupId>org.apache.maven.plugins</groupId>
<artifactId>maven-source-plugin</artifactId>
<executions>
<execution>
<phase>package</phase>
<goals>
<goal>jar-no-fork</goal>
</goals>
</execution>
</executions>
</plugin>
<!-- Javadoc -->
<plugin>
<groupId>org.apache.maven.plugins</groupId>
<artifactId>maven-javadoc-plugin</artifactId>
<executions>
<execution>
<phase>package</phase>
<goals>
<goal>jar</goal>
</goals>
</execution>
</executions>
</plugin>
<!-- GPG mvn clean deploy -P release -Dgpg.passphrase=YourPassphase-->
<plugin>
<groupId>org.apache.maven.plugins</groupId>
<artifactId>maven-gpg-plugin</artifactId>
<executions>
<execution>
<id>sign-artifacts</id>
<phase>verify</phase>
<goals>
<goal>sign</goal>
</goals>
</execution>
</executions>
</plugin>
</plugins>
</build>
<distributionManagement>
<repository>
<id>releases</id>
<url>https://oss.sonatype.org/service/local/staging/deploy/maven2/</url>
</repository>
<snapshotRepository>
<id>snapshots</id>
<url>https://oss.sonatype.org/content/repositories/snapshots/</url>
</snapshotRepository>
</distributionManagement>
</profile>
</profiles>
  1. 把之前创建 issue 时注册的账号配置到 maven 的配置文件里,找到 maven 安装目录下conf/setting.xml文件,在<servers>标签里添加。
1
2
3
4
5
6
7
8
9
10
<server>
<id>releases</id>
<username></username>
<password></password>
</server>
<server>
<id>snapshots</id>
<username></username>
<password></password>
</server>

把用户名和密码填好即可。

部署 jar 包

  1. 使用下面的命令行,会需要输入之前用 gpg 生成密钥时输入的 Passphase,也有可能会弹窗出来提示输入 Passphase。
    (我这加了-Dgpg.passphrase=YourPassphase 选项并没有生效,还是会弹窗出来提示输入 Passphase)
1
mvn clean deploy -P release -Dgpg.passphrase=YourPassphase
  1. 如果部署成功的话使用创建 issue 的帐号登录这个网址https://oss.sonatype.org/,然后看图操作。
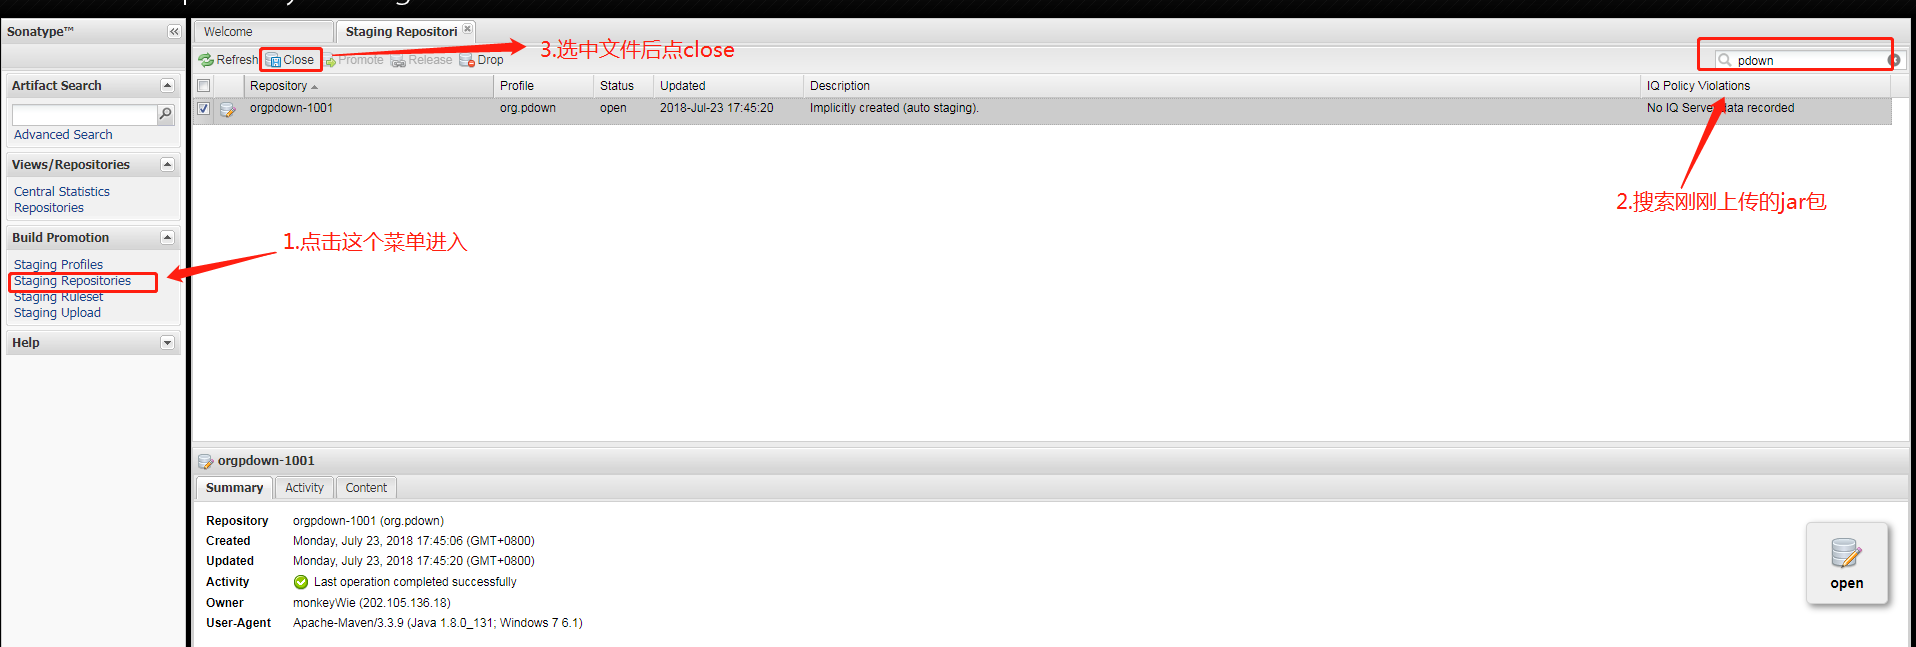
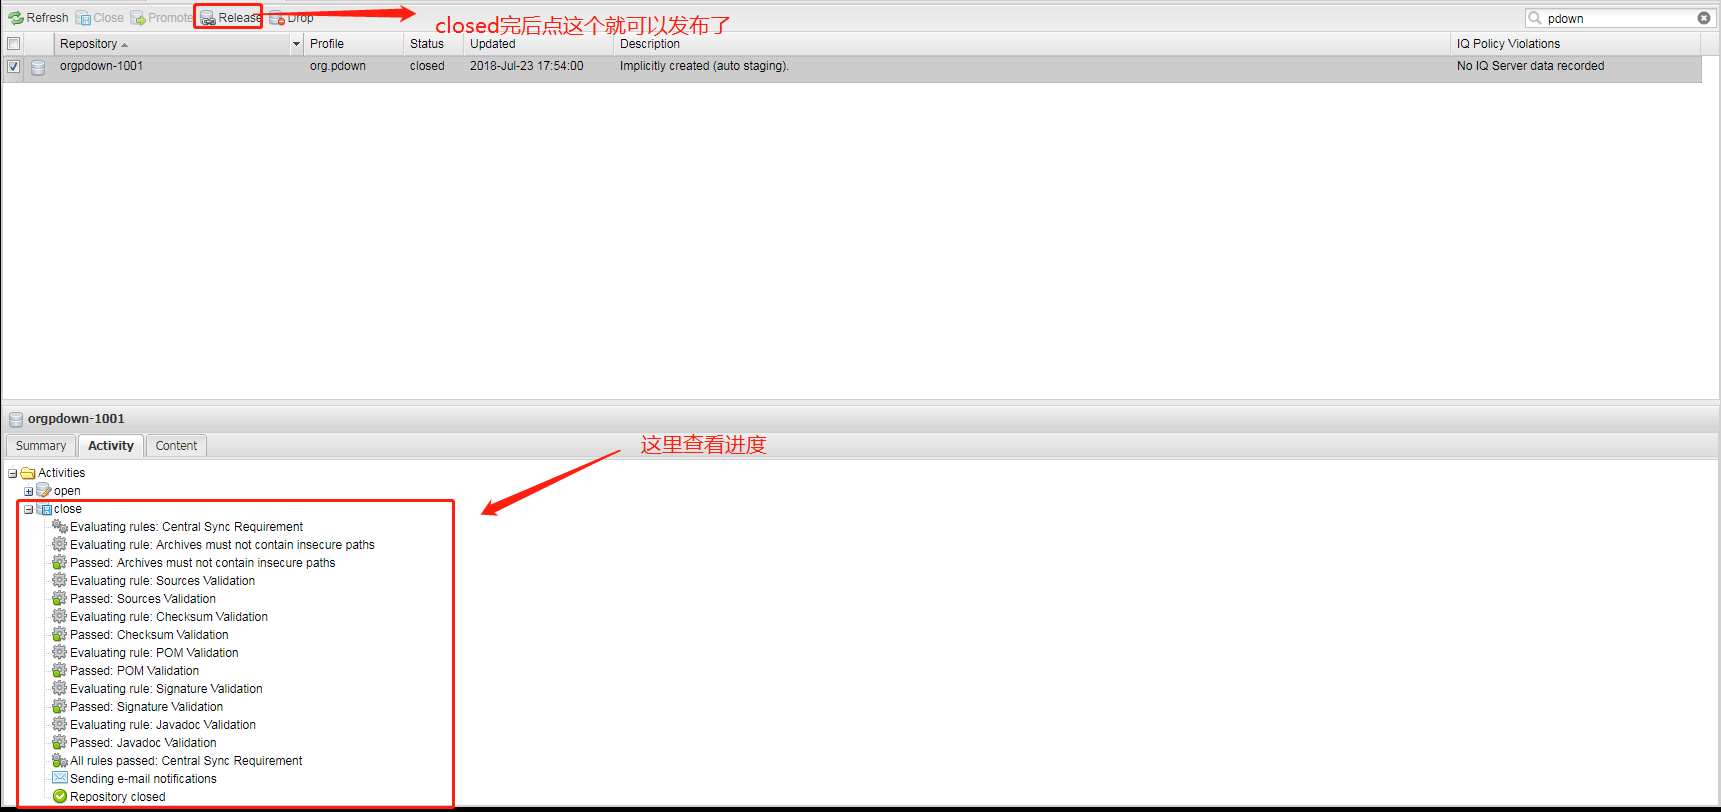
  2. close 完了系统会验证 jar 包,点击刷新可以看到最新的进度,当全部验证通过的时候,状态会变成closed,然后再选中文件Release就发布完成了。然后等个几个小时就可以在中央仓库搜索到自己发布的 jar 包了。

我是MonkeyWie,欢迎扫码👇👇关注!不定期在公众号中分享JAVAGolang前端dockerk8s等干货知识。

如果觉得本文对您有帮助,可以请我喝一杯咖啡☕