0%

Github Actions尝鲜

介绍

Github Actions是 github 官方推出的一款 CI(持续集成)工具,目前还处于Beta版本,需要申请内测资格才能使用,申请成功之后在自己的代码仓库就可以看到Actions了。

使用说明

这里简单介绍下 Github Actions中的概念,具体可以参考官方文档

术语

  1. workflow
    表示一次持续集成的过程
  2. job
    表示构建任务,每个 workflow 可以由一个或者多个 job 组成,可支持并发执行 job,所有 job 执行完也就代表着 workflow 结束
  3. step
    每个 job 由一个或多个 step 组成,按顺序依次执行
  4. action
    每个 step 由一个或多个 action 组成,按顺序依次执行,这里 action 需要特别说明一下,action 是可以是自定义脚本或引用第三方的脚本,依赖着 github 开源社区,许多 action 都可以直接复用,无需自己编写,github 已经提供了一个action 市场,可以搜索到各种第三方 actions,并且官方也提供了许多 actions。

构建环境

每个 job 都可以指定对应的操作系统,支持Windows、Linux、macOS,github 会提供一个虚拟机来执行对应的 job。

硬件规格:

  • 双核 CPU
  • 7GB 内存
  • 14GB 固态硬盘

使用限制:

  • 每个仓库只能同时支持 20 个 workflow 并行
  • 每小时可以调用 1000 次 github API
  • 每个 job 最多可以执行 6 个小时
  • 免费版的用户最大支持 20 个 job 并发执行,macOS 系统的话最大只支持 5 个

可以看到这个配置下,普通的项目持续集成肯定没什么问题的。

构建记录

通过仓库中的Actions选项卡,可以看到项目中的 workflow 构建记录:

点击一条记录可以进入详情页面,可以实时查看每一个action的控制台输出,方便调试:

实例

前面大概介绍了一下基本的概念,下面就直接通过几个实例看看 Github Actions是如何使用的。

自动部署 Hexo 博客到 Github Page

首先第一个想到能用到Github Actions的就是我的博客了,项目托管在https://github.com/monkeyWie/monkeywie.github.io,目前项目有两个分支,master分支用于存放 hexo 编译之后的静态文件,另一个hexo分支用于存放 hexo 项目环境和 markdown 文章,master分支通过Github Page配置之后可以通过monkeywie.github.io域名访问。

之前写完博客之后都是需要手动执行一遍命令进行部署:

1
hexo clean&&hexo d

然后再把hexo分支代码推送到 github 上

1
git push

在使用Github Actions之后,只需要把hexo分支代码推送到 github 上,剩下的全部交给Github Actions即可,在此之前我们需要生成一对公私钥用于 hexo 的部署操作,因为 hexo 自带的部署命令hexo d需要有 git 远程仓库读写权限。

1
2
3
4
5
6
7
8
9
10
11
12
13
14
15
16
17
18
19
20
21
22
ssh-keygen
Generating public/private rsa key pair.
Enter file in which to save the key (/root/.ssh/id_rsa):
Created directory '/root/.ssh'.
Enter passphrase (empty for no passphrase):
Enter same passphrase again:
Your identification has been saved in /root/.ssh/id_rsa.
Your public key has been saved in /root/.ssh/id_rsa.pub.
The key fingerprint is:
SHA256:XG1vkchp5b27tteZASx6ZrPRtTayGYmacRdjjRxR1Y0 root@8fe85d51123b
The key's randomart image is:
+---[RSA 2048]----+
| .+o=|
| o *Eoo|
| . X B .|
| . . + X +.|
| S . = O..|
| o O B =.|
| O = *.*|
| o . o ++|
| .oo|
+----[SHA256]-----+

先把~/.ssh/id_rsa.pub中的公钥添加到 Github 对应仓库的Deploye keys中:

再将~/.ssh/id_rsa中的私钥添加到 Github 对应仓库的Secrets中,Name 定义为ACTION_DEPLOY_KEY,目的是在构建的时候可以读取该私钥并配添加到虚拟机中,以获取 git 仓库访问权限:

准备工作完成后,接着就按照教程,在hexo分支创建.github/workflows/main.yaml文件用于配置 hexo 部署。

1
2
3
4
5
6
7
8
9
10
11
12
13
14
15
16
17
18
19
20
21
22
23
24
25
26
27
28
29
30
31
32
33
34
35
name: CI

on:
push:
branches:
- hexo
jobs:
build:
runs-on: ubuntu-latest

steps:
- name: Checkout source
uses: actions/checkout@v1
with:
ref: hexo
- name: Use Node.js ${{ matrix.node_version }}
uses: actions/setup-node@v1
with:
version: ${{ matrix.node_version }}
- name: Setup hexo
env:
ACTION_DEPLOY_KEY: ${{ secrets.ACTION_DEPLOY_KEY }}
run: |
mkdir -p ~/.ssh/
echo "$ACTION_DEPLOY_KEY" > ~/.ssh/id_rsa
chmod 600 ~/.ssh/id_rsa
ssh-keyscan github.com >> ~/.ssh/known_hosts
git config --global user.email "liwei2633@163.com"
git config --global user.name "monkeyWie"
npm install hexo-cli -g
npm install
- name: Hexo deploy
run: |
hexo clean
hexo d

具体的配置语法这里就不详细说明了,可以自行在官方文档中查阅。

构建流程如下:

  1. 监听hexo分支的 push 操作
  2. 运行一个 job,在ubuntu虚拟机环境下
  3. 使用官方提供的actions/checkout@v1来拉取源码
  4. 使用官方提供的actions/setup-node@v1来安装 node 环境
  5. 使用 ${{ secrets.ACTION_DEPLOY_KEY }}读取刚刚生成的私钥,并设置成环境变量,${{ exp }}写法为 actions 内置的表达式语法,详细文档参考:contexts-and-expression-syntax-for-github-actions
  6. 将私钥写入到~/.ssh/id_rsa文件中,并把github.com域名加入到~/.ssh/known_hosts文件中,以免第一次 ssh 访问时弹出交互式命令。
  7. 配置 git 用户信息
  8. 安装 hexo 命令行工具和项目的依赖
  9. 调用 hexo 命令进行部署

hexo分支代码推到 github 上触发 workflow ,通过Actions选项卡进入就可以看到项目的构建情况了。

至此改造完成,以后只需要写完文章直接提交代码就可以自动部署了,甚至都可以不装 node 环境进行写作简直不要太方便。

自动创建项目 Release

有些项目在发布新版本时,一般都会创建一个Github Release,并且把对应编译好之后的文件上传到Release的资源列表中,例如:

如果这个使用手动操作的话,不仅步骤重复又繁琐(每次都要编译出各个操作系统对应的发行包再进行上传),而且最蛋疼的是对于国内的网络环境来说,上传文件速度简直不能忍,好不容易上传了一大半搞不好就因为网络原因又要重新上传,相信用过的人都深有体会。

我就在想如果能用Github Actions来创建Release,并且做对应的编译和上传,那上面的问题都可以迎刃而解了,于是在官方市场搜索了一下Release关键字,果然已经有提供对应的actions了:

接着创建一个Github仓库,我测试的仓库地址是https://github.com/monkeyWie/github-actions-demo,项目用 go 语言写的,代码非常简单就是两个 hello world 级别的代码,里面包含了普通的 go 程序和 cgo 程序。

项目的构建流程是在项目git push --tags的时候,触发 workflow,通过Github Actions编译出来Windows、Linux、macOS三个操作系统对应的 64 位可执行文件,再根据tag nametag message来创建对应的Github Release,并将编译好的文件上传。

同样的创建一个.github/workflows/main.yml文件,内容如下:

1
2
3
4
5
6
7
8
9
10
11
12
13
14
15
16
17
18
19
20
21
22
23
24
25
26
27
28
29
30
31
32
33
34
35
36
37
38
39
40
41
42
43
44
45
46
47
48
49
50
51
52
53
54
55
56
57
58
59
60
61
62
63
64
65
66
67
68
69
70
71
72
73
74
75
76
77
78
79
80
81
82
83
84
85
86
87
88
89
90
91
92
93
94
95
96
97
98
99
100
101
102
name: CI

on:
push:
# Sequence of patterns matched against refs/tags
tags:
- "v*" # Push events to matching v*, i.e. v1.0, v20.15.10
jobs:
build:
runs-on: ubuntu-latest

steps:
- name: Checkout source
uses: actions/checkout@v1
- name: Use Golang
uses: actions/setup-go@v1
with:
go-version: "1.13.x"
- name: Build normal
run: |
CGO_ENABLED=0 GOOS=windows GOARCH=amd64 go build -o normal-windows-x64.exe cmd/normal/main.go
CGO_ENABLED=0 GOOS=linux GOARCH=amd64 go build -o normal-linux-x64 cmd/normal/main.go
CGO_ENABLED=0 GOOS=darwin GOARCH=amd64 go build -o normal-darwin-x64 cmd/normal/main.go
zip normal-windows-x64.zip normal-windows-x64.exe
zip normal-linux-x64.zip normal-linux-x64
zip normal-darwin-x64.zip normal-darwin-x64
- name: Build cgo
run: |
go get github.com/monkeyWie/xgo
~/go/bin/xgo -targets=windows/amd64,linux/amd64,darwin/amd64 -ldflags="-w -s" -pkg=cmd/cgo/main.go -out=cgo .
mv cgo-windows-* cgo-windows-x64.exe
mv cgo-linux-* cgo-linux-x64
mv cgo-darwin-* cgo-darwin-x64
zip cgo-windows-x64.zip cgo-windows-x64.exe
zip cgo-linux-x64.zip cgo-linux-x64
zip cgo-darwin-x64.zip cgo-darwin-x64
- name: Create Release
id: create_release
uses: monkeyWie/create-release@master
env:
GITHUB_TOKEN: ${{ secrets.GITHUB_TOKEN }}
with:
tag_name: ${{ github.ref }}
release_name: Release ${{ github.ref }}
draft: false
prerelease: false

- name: Upload Release normal windows
uses: actions/upload-release-asset@v1.0.1
env:
GITHUB_TOKEN: ${{ secrets.GITHUB_TOKEN }}
with:
upload_url: ${{ steps.create_release.outputs.upload_url }} # This pulls from the CREATE RELEASE step above, referencing it's ID to get its outputs object, which include a `upload_url`. See this blog post for more info: https://jasonet.co/posts/new-features-of-github-actions/#passing-data-to-future-steps
asset_path: ./normal-windows-x64.zip
asset_name: normal-${{ steps.create_release.outputs.tag }}-windows-x64.zip
asset_content_type: application/zip
- name: Upload Release normal linux
uses: actions/upload-release-asset@v1.0.1
env:
GITHUB_TOKEN: ${{ secrets.GITHUB_TOKEN }}
with:
upload_url: ${{ steps.create_release.outputs.upload_url }} # This pulls from the CREATE RELEASE step above, referencing it's ID to get its outputs object, which include a `upload_url`. See this blog post for more info: https://jasonet.co/posts/new-features-of-github-actions/#passing-data-to-future-steps
asset_path: ./normal-linux-x64.zip
asset_name: normal-${{ steps.create_release.outputs.tag }}-linux-x64.zip
asset_content_type: application/zip
- name: Upload Release normal darwin
uses: actions/upload-release-asset@v1.0.1
env:
GITHUB_TOKEN: ${{ secrets.GITHUB_TOKEN }}
with:
upload_url: ${{ steps.create_release.outputs.upload_url }} # This pulls from the CREATE RELEASE step above, referencing it's ID to get its outputs object, which include a `upload_url`. See this blog post for more info: https://jasonet.co/posts/new-features-of-github-actions/#passing-data-to-future-steps
asset_path: ./normal-darwin-x64.zip
asset_name: normal-${{ steps.create_release.outputs.tag }}-darwin-x64.zip
asset_content_type: application/zip

- name: Upload Release cgo windows
uses: actions/upload-release-asset@v1.0.1
env:
GITHUB_TOKEN: ${{ secrets.GITHUB_TOKEN }}
with:
upload_url: ${{ steps.create_release.outputs.upload_url }} # This pulls from the CREATE RELEASE step above, referencing it's ID to get its outputs object, which include a `upload_url`. See this blog post for more info: https://jasonet.co/posts/new-features-of-github-actions/#passing-data-to-future-steps
asset_path: ./cgo-windows-x64.zip
asset_name: cgo-${{ steps.create_release.outputs.tag }}-windows-x64.zip
asset_content_type: application/zip
- name: Upload Release cgo linux
uses: actions/upload-release-asset@v1.0.1
env:
GITHUB_TOKEN: ${{ secrets.GITHUB_TOKEN }}
with:
upload_url: ${{ steps.create_release.outputs.upload_url }} # This pulls from the CREATE RELEASE step above, referencing it's ID to get its outputs object, which include a `upload_url`. See this blog post for more info: https://jasonet.co/posts/new-features-of-github-actions/#passing-data-to-future-steps
asset_path: ./cgo-linux-x64.zip
asset_name: cgo-${{ steps.create_release.outputs.tag }}-linux-x64.zip
asset_content_type: application/zip
- name: Upload Release cgo darwin
uses: actions/upload-release-asset@v1.0.1
env:
GITHUB_TOKEN: ${{ secrets.GITHUB_TOKEN }}
with:
upload_url: ${{ steps.create_release.outputs.upload_url }} # This pulls from the CREATE RELEASE step above, referencing it's ID to get its outputs object, which include a `upload_url`. See this blog post for more info: https://jasonet.co/posts/new-features-of-github-actions/#passing-data-to-future-steps
asset_path: ./cgo-darwin-x64.zip
asset_name: cgo-${{ steps.create_release.outputs.tag }}-darwin-x64.zip
asset_content_type: application/zip

构建流程如下:

  1. 监听 tag name 为v开头的 push
  2. 运行一个 job,在ubuntu虚拟机环境下
  3. 拉取源码,安装golang 1.13.x环境
  4. 使用go build交叉编译出不同操作系统下 64 位可执行文件,并使用 zip 压缩
  5. 使用xgo交叉编译出不同操作系统下 64 位可执行文件,并使用 zip 压缩
  6. 使用monkeyWie/create-release@master创建 Release,其中会用到${{ secrets.GITHUB_TOKEN }},这是Github Actions内置的一个秘钥,用于授权访问你自己的 github 存储库,原理就是使用这个TOKEN调用Github API来进行创建 release,还有一个${{ github.ref }}也是Github Actions内置的一个变量,然后通过 action 的with进行参数传递。
  7. 使用`actions/upload-release-asset@v1.0.1上传文件,这里使用了两个表达式$$,可以获取到指定action的输出,第一个是获取创建好的 release 对应的上传地址,第二个是获取对应的 tag(例如:v1.0.0),这样就可以在把上传的文件带上版本号。因为这个action`不支持多个文件上传,所以就写了多个 action 进行上传。

接下来在项目打个tag,然后push上去看看效果:

1
2
3
4
5
6
7
# 创建tag名为v1.0.8,并添加描述
git tag -a "v1.0.8" -m '发布v1.0.8版本
修复了以下bug:
1. xxxxx
2. xxxxx'
# 把tag推到github上
git push --tags

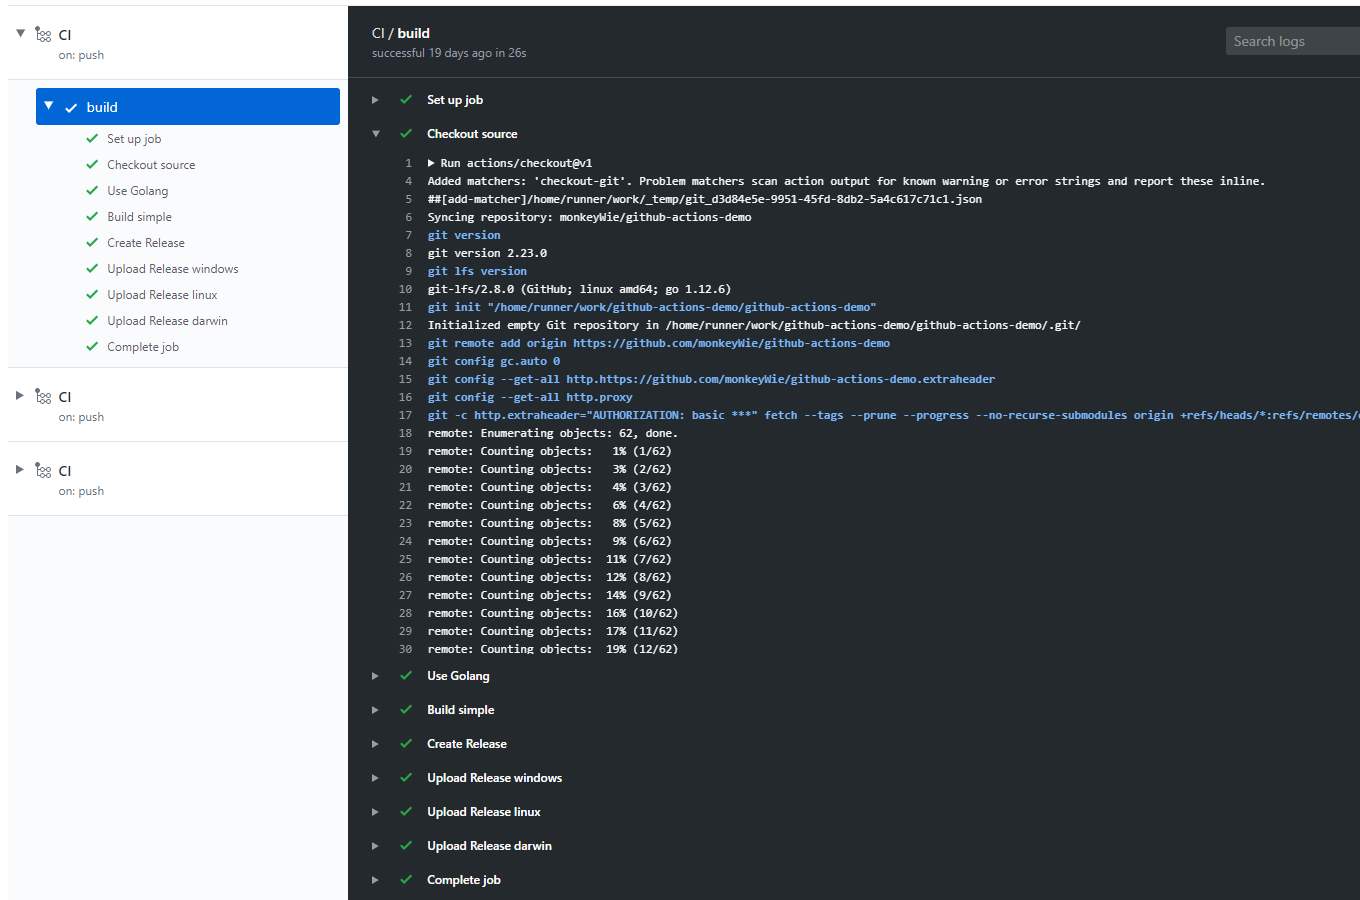
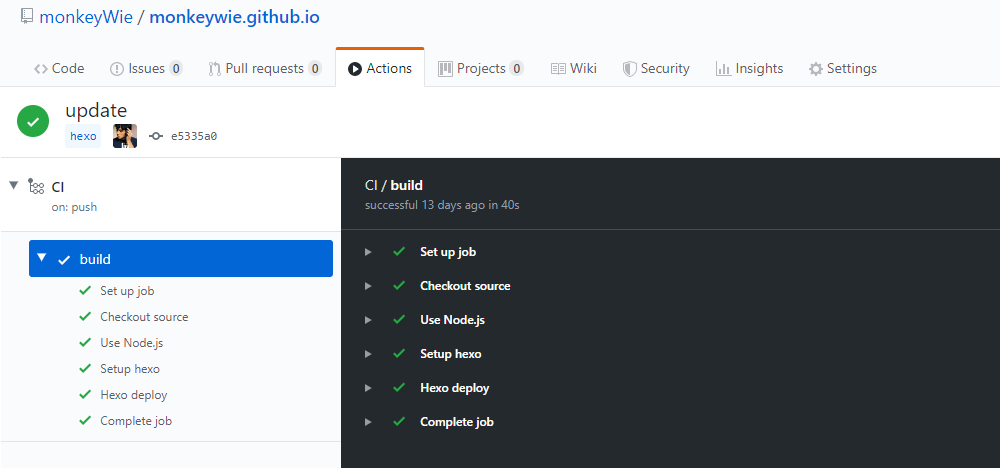
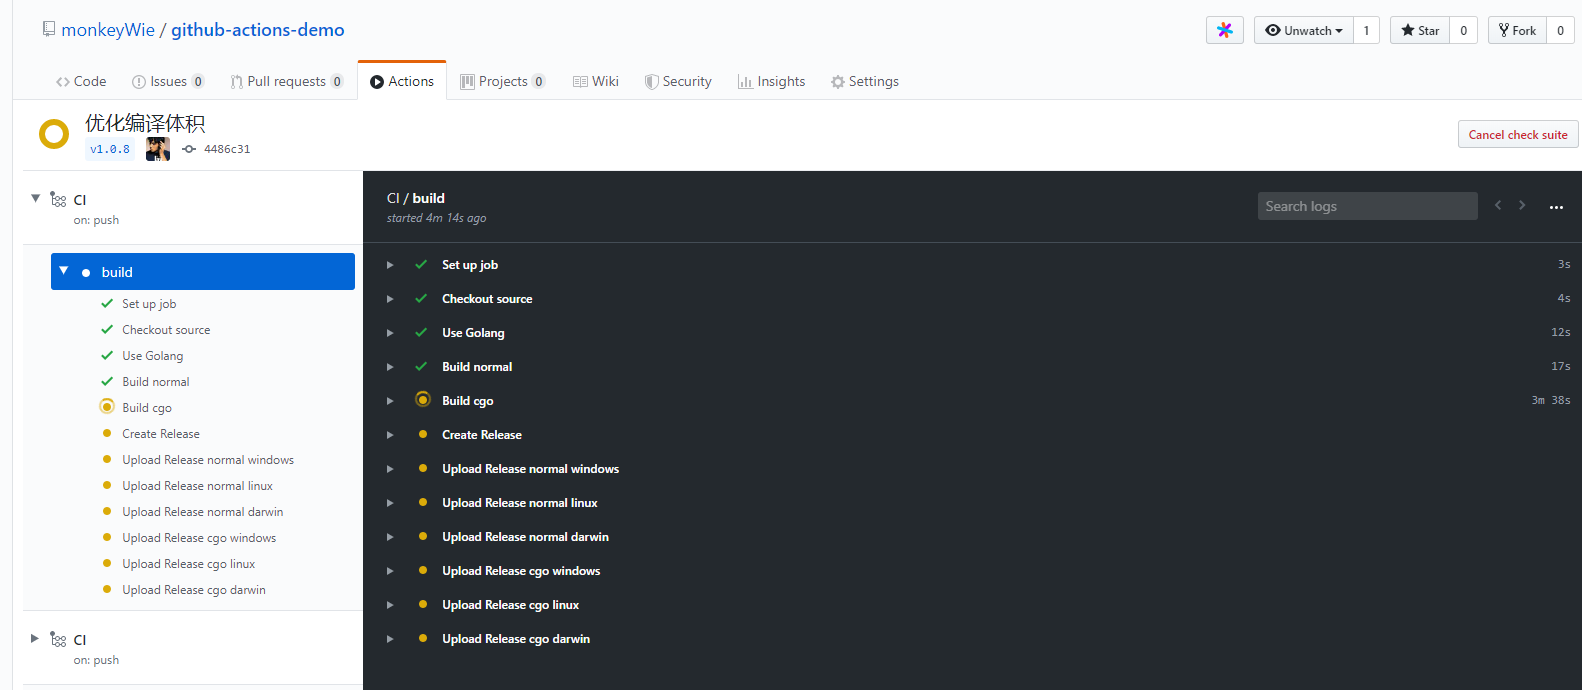
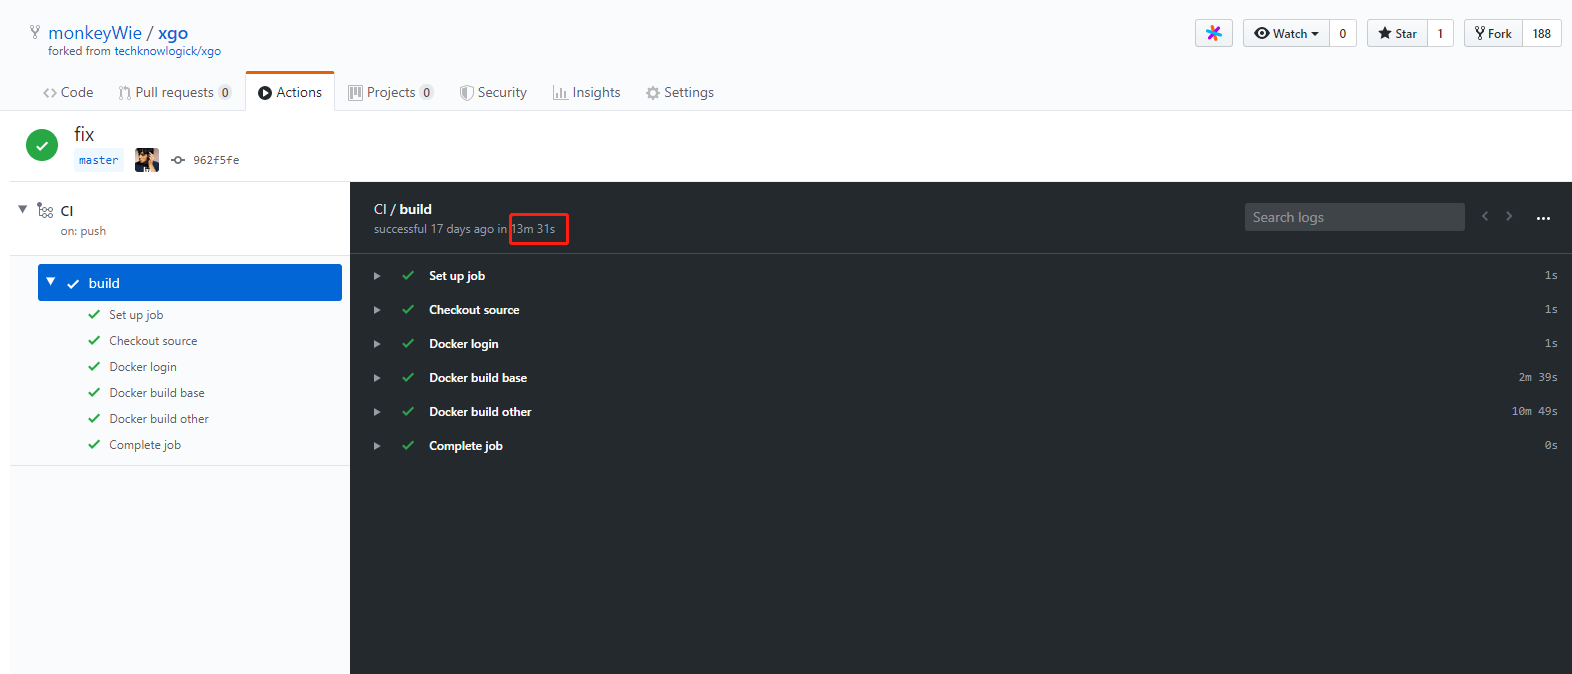
然后就可以看到已经有一个新的workflow正在运行了:

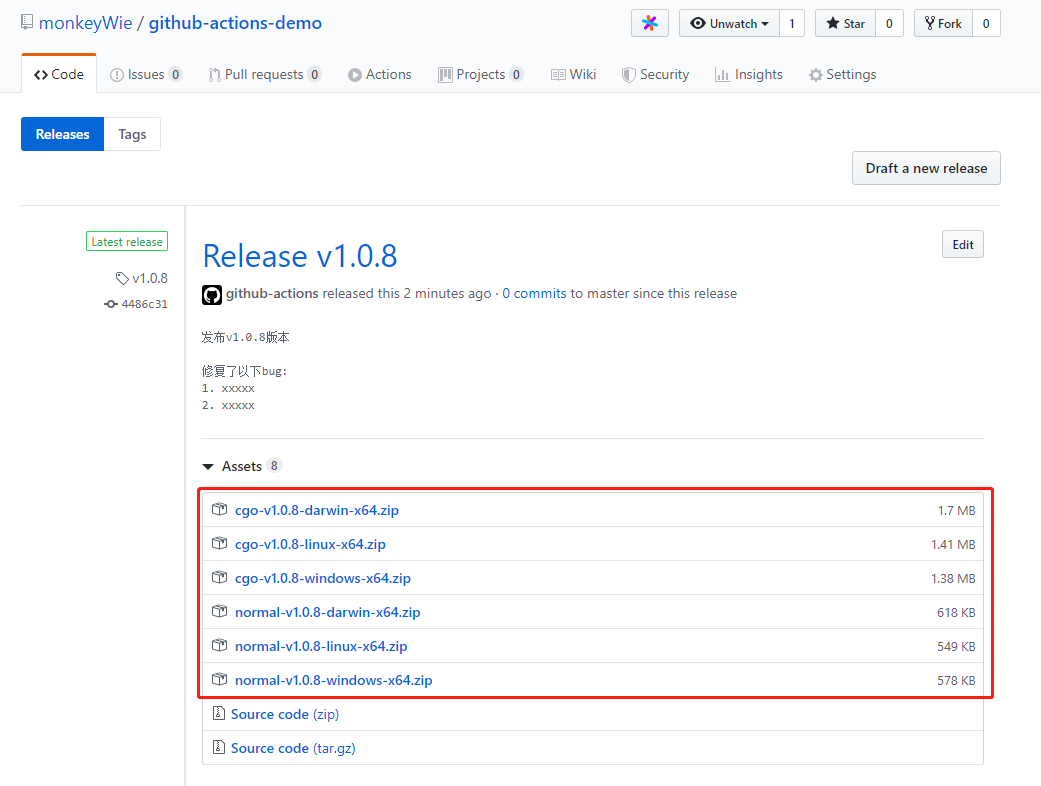
运行完成后在Releases页面查看结果:

完美!和预想的结果一致。

注:由于官方的create-release有点不能满足需求,于是我自己fork了一份create-release代码,就是把tag name给输出来了,这里是相关的PR,还没被合并,所以上面的创建 Release 的 action 是用的我自己的仓库monkeyWie/create-release@master,还有关于 go 交叉编译的知识,有兴趣可以看看我的这篇博客:go-cross-compile

自动构建和部署 docker 镜像

Github Actions提供的虚拟机中,已经内置了docker,而刚好我有一个项目因为国内的网络原因构建docker镜像非常的慢,这是我fork的一个用于 go 项目交叉编译的项目,仓库地址https://github.com/monkeyWie/xgo,这个项目的主要工作原理就是通过 docker 里内置好各种交叉编译的工具链,然后对外提供 go 项目交叉编译功能,下面节选一点Dockerfile内容:

看这大量的apt-get install,就知道在本地构建有多慢了,下面就改用Github Actions来帮忙构建和部署镜像。

由于要将镜像推送到docker hub官方镜像仓库上,需要验证账号信息,
这里我把自己的用户密码配置到了Secrets中,以便在 workflow 配置文件中可以访问到:

编写构建文件.github/workflows/main.yml

1
2
3
4
5
6
7
8
9
10
11
12
13
14
15
16
17
18
19
20
21
22
23
24
25
26
27
28
29
30
31
32
33
34
35
name: CI

on:
push:
branches:
- master
paths:
- "docker/base/*"

jobs:
build:
runs-on: ubuntu-latest

steps:
- name: Checkout source
uses: actions/checkout@v1
- name: Docker login
run: docker login -u liwei2633 -p ${{ secrets.DOCKER_HUB_PWD }}
- name: Docker build base
run: |
docker pull liwei2633/xgo:base
docker build --cache-from=liwei2633/xgo:base -t liwei2633/xgo:base ./docker/base
docker push liwei2633/xgo:base
- name: Docker build other
run: |
docker build -t liwei2633/xgo:go-1.12.10 ./docker/go-1.12.10
docker push liwei2633/xgo:go-1.12.10
docker build -t liwei2633/xgo:go-1.12.x ./docker/go-1.12.x
docker push liwei2633/xgo:go-1.12.x
docker build -t liwei2633/xgo:go-1.13.1 ./docker/go-1.13.1
docker push liwei2633/xgo:go-1.13.1
docker build -t liwei2633/xgo:go-1.13.x ./docker/go-1.13.x
docker push liwei2633/xgo:go-1.13.x
docker build -t liwei2633/xgo:go-latest ./docker/go-latest
docker push liwei2633/xgo:go-latest

构建流程如下:

  1. 监听 master 分支的 push 操作,并且docker/base目录下文件有修改才进行构建,这样做的目的是在其它与 docker 构建无关的文件改动了不会去触发 workflow
  2. 运行一个 job,在ubuntu虚拟机环境下
  3. 拉取源码
  4. 登录 docker hub,通过之前配置的${{ secrets.DOCKER_HUB_PWD }},这里不用担心控制台输出会暴露密码,通过secrets访问的变量在控制台输出时都会打上马赛克
  5. 构建镜像,这里使用了一个小技巧--cache-from=liwei2633/xgo:base,预先下载好之前的镜像liwei2633/xgo:base,然后可以使用docker的缓存机制加快构建速度
  6. 推送镜像并编译和推送不同 go 版本的镜像

这样通过Github Actions就把构建镜像和部署时间的缩小了到了13分钟

虽然还是挺慢的但是跟本地构建比起来快了不是一个量级,有次本地构建等了一个多小时,因为网络原因导致一个软件源安装失败直接没了又要重头开始构建,所以高下立判,Github Actions真香!!

后记

通过上面三个实例项目,可以看得出Github Actions为我们节省大量的时间和重复的操作,且通过官方的 actions 市场很方便的就可以实现大部分编排功能,真是一个可以吹爆的良心产品,所以赶紧一起来尝鲜啊。


我是MonkeyWie,欢迎扫码👇👇关注!不定期在公众号中分享JAVAGolang前端dockerk8s等干货知识。

如果觉得本文对您有帮助,可以请我喝一杯咖啡☕